Showing posts with label diy. Show all posts

Simple and Easy Mochas

Tuesday, December 16, 2014


We had some friends visiting and staying over this past weekend, and rather than all going out for coffee, or sending one person out on a chilly morning, we made our own at home! I adapted a recipe I found online and used ingredients that we already had around the house. Super simple, easy, and yummy on a cold morning!

Simple and Easy Mochas (makes 4 cups)
Ingredients:
1/2 cup of unsweetened cocoa powder
1/2 cup of sugar
1/4 teaspoon of salt
4 1/2 cups of milk (we used almond milk)
4 shots of espresso OR 4 individual packs of instant coffee
1 teaspoon of vanilla extract

Directions:
1. Whisk together the cocoa powder, sugar, salt, and about 1 cup of milk in a pot over medium heat.
2. After the ingredients are dissolved and blended, slowly whisk in the rest of the milk.
3. Whisk occasionally until it starts steaming and is at your desired temperature.
4. Stir in the vanilla extract
5a. (If using espresso shots) Prepare 4 cups by putting a shot of espresso in each, then pour the hot chocolate mix into the cups.
5b. (If using instant coffee) Prepare 4 cups by putting a pack of instant coffee in each, then pour the hot chocolate mix into the cups, and stir to dissolve.
6. Enjoy!


Vintage Bottle Brush Trees

Wednesday, December 10, 2014


This holiday season, I've been obsessing over vintage Christmases. I grew up in the 90's but the city I grew up in still had a lot of houses, buildings, and signs from the 50's and 60's so everything midcentury feels very nostalgic to me and reminds me of home. Pair that with Christmas and I think we have the perfect combination.

After obsessively searching and pinning "midcentury modern Christmas" images, I kept coming across the beautiful pastels and silvers in vintage Shiny Brite ornaments. This set the stage for my color scheme this year, and so I decided to make my bottle brush trees match.


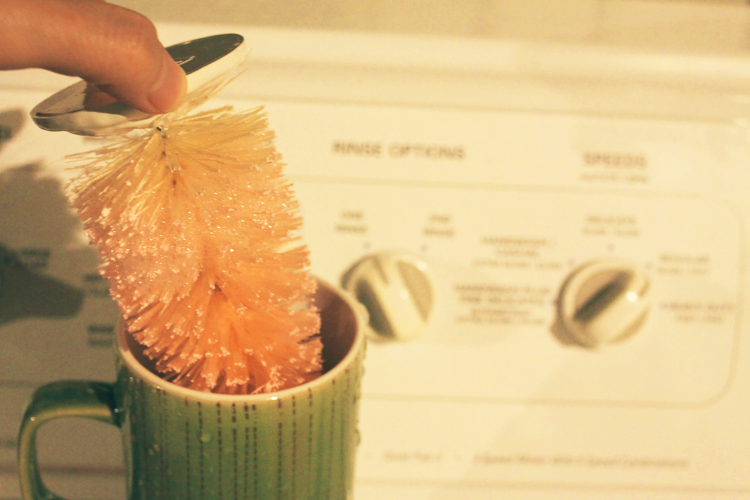
I started out with a bag of trees from Michael's, plus some leftover from last year. Dipped some in a 3 parts bleach, 1 part water solution. Rinsed them throughly in soapy warm water, and then waited for them to dry.


To make the light green trees, I just took them out of the bleach a bit sooner, and to really rinse out the bleach or it will continue to lighten the green as it dries. And for the pink ones, I just dipped them in a water and red food coloring bath.


Super easy, cute, and gives me that warm fuzzy nostalgic feeling. Also, please excuse the bad lighting, as I made these at night in the garage while baby slept!

Fall and Winter Sensory Bags

Tuesday, October 21, 2014

Remember when I went crazy at the dollar store? Well, I didn't stop at the sensory bottle rainbow. I also made themed sensory bags! 

For a sensory bag, you need
flat, non-pointy objects to put in the bag
hair gel
2 freezer bags
and duct tape.

1. Put all your objects in a freezer bag.
2. Pour in some gel (the amount of gel depends on how squishy vs. how jelly you want your bag).
3. Pour in some water to dilute the gel (this is good if you don't want to use all your gel on one bag).
4. Seal the bage while squeezing out as much air as possible.
5. Squish everything up!
6. Tape all edges with duct tape.
6. Double bag it and tape all edges again.


And here is my Halloween themed one with pumpkin confetti and googly eyes. 


Have fun!

Sensory Bottle Rainbow

Monday, October 20, 2014

Look! I went crazy at the dollar store!


A while back, I made baby a toy by filling a plastic bottle with rubber bands and bag clips. I don't think the bottle I used was meant to contain liquids and it started leaking, so we stopped giving it to him. The other day at my sister-in-law's, she told me that this was called a sensory bottle and that I could hot glue the cap to prevent leaks. That night I stayed up really late browsing Pinterest and the floodgates of homemade toys opened up on me and I couldn't wait to try out these diy sensory toys. And that is how I went crazy at the dollar store bright and early the next morning.

First up is my new and improved sensory bottle. All you need is
an empty bottle
things to put in the bottle (it helps to have at least one heavy object, like a marble)
fine glitter
hot glue
and clear hair gel.
(For this green one, I put way too many things. I think half the stuff would be enough.)

1. Put all your objects and the glitter in the bottle.
2. Put hair gel in the bottle (a quarter of your empty bottle or less will do).
3. Fill up the rest of the bottle with very warm water (leave room at the top for shaking).
4. Shake it up!
5. Fill up the rest of the bottle with cold water, letting the bubbles flow out.
6. Put hot glue on the cap and close it up!


The more gel you put, the more viscous the liquid, therefore suspending the glitter for a longer period of time. You can also use glitter glue in addition to the gel to make it extra viscous (almost like a colloid!) Have fun!

Finding More Uses for Old Clothes

Tuesday, October 14, 2014

After cleaning out my closet, I have two giant trash bags full of clothes that I don't wear anymore. I haven't had a chance to donate them, but I think that's a good thing. Last time, I dug through the bags and took out all the sweaters so that I can repurpose them into knit pants and a hat for the baby. This time, I dug through the bags once again for drawstrings and waist ties so that  I could make a sensory box for Mars. 

It doesn't look pretty or anything like a toy, but I think that's why Mars likes it so much! We've found that he is most interested in things that are not toys, so this turned out perfectly!

To make this box, you need
ribbons or drawstrings
a cardboard box small enough for baby to hold
old t-shirts
something to put inside so the box doubles as a rattle (I used crafting jingle bells)
and packing tape.

1. Cut off all the drawstrings on pajama bottoms, hooded sweatshirts, and dresses. You can use a few ribbons that you have around the house as well. 
2. Poke a small cardboard box with a sharp pencil (double times the amount of ribbons you have).
3. String the ribbons through one hole, tie a large knot, then string it through a second hole so that they all come back out of the box.
4. Stuffed the box with some old t-shirts and bells.
5. Seal it back up with packing tape.


Enjoy!

From Sweater to Romper and Pixie Hat

Wednesday, October 08, 2014


Last week I cleaned out my closet in an attempt to simplify and build a capsule wardrobe. So far, this resulted in a huge pile of clothes that I no longer wear. A lot of the stuff is still in good condition, it's just that I can't fit into it or it's not nursing friendly. One of these things was a nice cashmere sweater that just didn't fit right anymore. I really didn't want to throw it out since it was so soft and nice, so I repurposed it and made it into a romper and pixie hat for Mars.

Today, he wore this new outfit to see his cousin Lily. She is just two months older than him and she got freaked out by the hat! I think she thought that he was some kind of pointy alien or a monster! It was the cutest thing, I wish we got a picture of it!

15 weeks

Sunday, August 18, 2013

DIY muslin swaddles, three ways.

The internet taught me that muslin swaddle blankets are not made of muslin, but of gauze. I bought two and a half yards at Joann's, one white, one cream, then customized them three ways.


1. Cut, hemmed, and dyed.

After cutting and hemming the edges of the first one, I soaked it in a dye-bath for thirty minutes. I didn't use as much as the bottle called for so that I could get a lighter shade of green.


2. Cut, hemmed, and stamped.

For this one, I hand-carved a stamp...


...then, stamped the blanket with fabric paint using the bathroom tile as a guide.


3. Just plain cut and hemmed.


This one is just plain white. I want to stamp it but can't decide on what stamp to make next. Also, this was my least favorite part of the project. I think I pinned and hemmed around forty-five feet of fabric total. I'm kind of glad this is over!


14 weeks, 5 days

Friday, August 16, 2013

Today is the last Friday of Summer break and that makes me sad. It was so wonderful being able to spend my first trimester at home and not at work. In fear that I'll be too tired once school starts, I decided to be extra crafty today.

My first project of the day: Stamping side-snap tees!

I learned this really cool trick on the internet, and that's to put a piece of felt over fabric paint to create an ink pad! It worked really well.


 I didn't realize until later that I should've put a book in between the layers of fabric to prevent the smudging-effect that you see below.


This last one was made with a triangle stamp that I carved out of an eraser. 


It reminds me of jack-o-lantern eyes and teeth.

13 weeks, 4 days

Friday, August 09, 2013

I crocheted more baby toys!


I put rattles in them that have different sounds. The smallest one has mini-bells, the biggest one has one big bell, and the medium-sized one has rice! 

13 weeks, 3 days

Thursday, August 08, 2013

I am on a baby-toy-making spree! 


This was taken from a tutorial that I found on Pinterest. It was a lot of fun to make, plus, I finally got to use some of that Japanese fabric that I had been hoarding.

13 weeks, 3 days

Wednesday, August 07, 2013

Most of my day was spent sewing and crocheting these rattles for the baby. Maybe tomorrow, I'll go out and get better yarn. Today, I just used whatever I had around the house. They look a little deformed because the plastic container I used inside for the rattle was slightly too big. 


In case you can't really tell, it's a dinosaur and a bear.
Proudly designed by | mlekoshiPlayground |